Why URL redirects are so important and how to create them in Squarespace
As you and your business evolve you'll likely need to update your website to reflect the changes. Every time you change a URL slug on your website you run the risk of breaking old links.
You've probably experienced this as a consumer. You might have been looking for a product or information only to find yourself on a 404 Error page. This is the result of a broken link.
The good news is that it's easy to fix the broken links with a URL redirect!
First, let's start with the basics. What exactly is a URL redirect?

What is a URL Redirect?
A URL redirect is a way of forwarding, or redirecting, website visitors away from pages that don't exist to active pages.
There are two common types of URL redirects: 301 redirects and 302 redirects.
301 redirects are the most common type of URL redirect and are meant for permanent changes to your website. On the other hand, 302 redirects are meant for temporary changes to your website.
Let's review these redirects in a bit more detail to get a better sense of their use cases and why they are so important to use on your website.
301 Redirects
As previously mentioned, 301 redirects are meant for permanent changes on your website. A 301 redirect forwards visitors to a different URL when they click on a link that would otherwise lead to a non-existent or non-active page (404 Error).
Putting 301 redirects in place not only enhances the user experience of your website because your visitor is reaching the correct content, but 301 redirects also tell search engines that your page has moved and the search engine will then transfer the original page's rank to the new page. That's all a way to say that your website's SEO won't be affected by transferring pages. Pretty cool, huh?
301 redirects are a great solution for most businesses needs, but I've outlined a few scenarios you might encounter that 301 redirects are helpful for:
YOU CHANGED THE URL OF A PAGE OR BLOG POST
You can change the URL of a page or blog post by going into its settings and updating the
URL slug. Whether you change the URL completely ( /offerings ➝ /services ) or simply fix a
spelling error, changing any aspect of the page URL will break any links it's connected to. You
can set up a 301 redirect to transfer anyone who navigates to the original URL to your updated
URL without the need to track down any broken links.
YOU CREATED A NEW VERSION OF A PAGE OR BLOG POST
Similar to the above, if you have created a new version of a page or blog post on your website
you probably want to steer visitors to the most up-to-date version. Using a 301 redirect, you
can forward any visitors who might land on your original content to the latest version instead.
Best of all your page ranking will be intact!
YOU DELETED AN OLD PAGE OR BLOG POST
The same goes for deleting or disabling any pages or blog posts. You may want to consolidate
pages or delete certain content from your website, but be careful that if you've linked any of
this content, website visitors will be met with a 404 Error. To avoid this, you can use a 301
redirect to ensure visitors are landing on relevant, active content.
YOU ARE MOVING WEBSITES
Whether you're redesigning your website or moving to a completely different platform, this is
a big undertaking and URLs might change in the process. 301 redirects to the rescue! Setting
up 301 redirects will ensure a seamless transition for visitors and will keep your search engine
ranking in place.
302 Redirects
302 redirects are meant for temporary changes on your website. A 302 redirect works the same in that it will direct visitors to a different URL when they click on a link to a disabled page.
The difference between a 301 and 302 redirect is on the SEO side - with a 302 redirect, search engines won't give the new page the same rank as the old one. Since the 302 redirect is temporary, it lets search engines know that the original page should keep its rank as it will be back online at some point.
302 redirects are less common and are often used with businesses who change out their products and or services often.
If you're planning to temporarily replace a page with another page as you cycle through different offerings, or if you need to temporarily take down a page to update its content, this might be what you're looking for!
For example, a farm-to-table restaurant that changes out its menu seasonally might benefit from using a 302 redirect to temporarily transfer users to a new, seasonal menu knowing they'll have a new menu soon.
Phew! That was a lot of information, but overall, a general rule of thumb we use is that most URL changes can benefit from setting up a 301 redirect.
Now that we know what URL redirects are and why they are so important to use, let's walk through how we can set up URL redirects in Squarespace.
How to Create URL Redirects in Squarespace
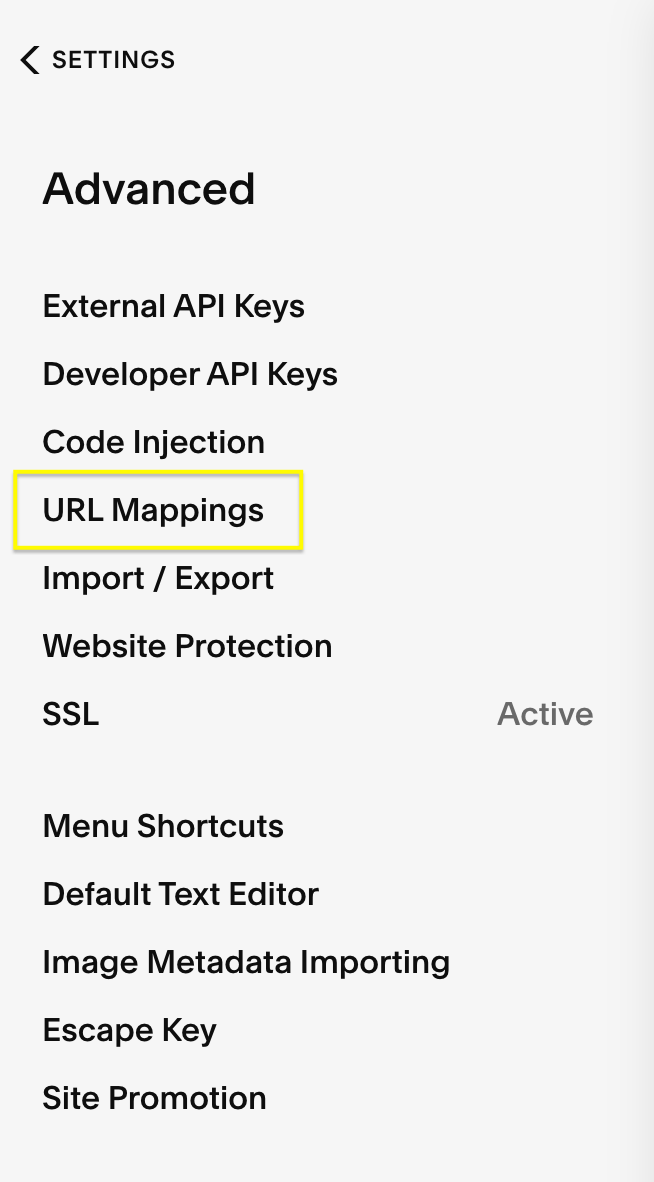
1. In the Home menu, click Settings.

2. Scroll down and click Advanced.

3. From here, select URL mappings.
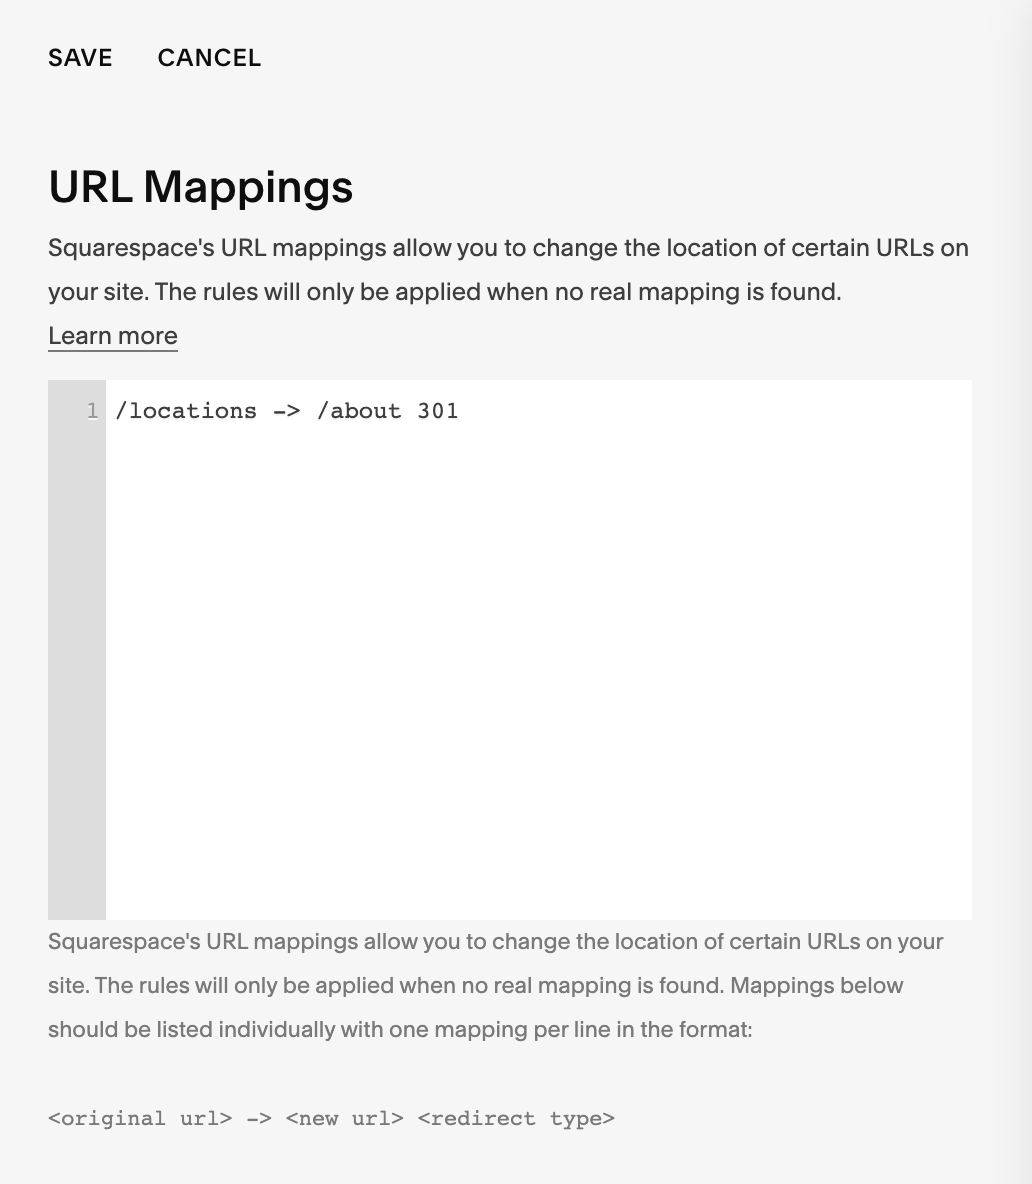
4. Click into the text box and add your redirects in the following format:
/old-url-here -> /new-url-here 301
First, you will want to replace old-url-here with the URL slug of your old web page. You don't need to add the full domain, but rather only what comes after the slash.
Next, you will replace new-url-here with the URL slug of the new page you'd like to redirect your website visitors to.
Depending on the type of redirect you're looking to implement, you'll either keep the 301 in place or you can change it to 302 if you're looking to create a temporary redirect.
Here is what a URL Mappings panel with a 301 redirect looks like for reference:

5. Hit Save to apply your changes.

Once you've saved your redirects, we recommend testing them to ensure everything is smooth sailing. To test the redirects you've just set up, type the old URL into your browser and you should be automatically redirected to the new one.
If that happens, your URL redirect is set up correctly and you should be good to go!
If you're landing on a 404 Error page, the redirect isn't set up correctly. First, check that your URL mapping formula is applied correctly (see Step 4). If everything looks good, take a look at the status of your pages or blog content. For the redirect to sync, the original content should be disabled or deleted, and the new content should be active.
URL redirects are a more advanced concept, so we hope you found this explanation easy to understand and implement!
No matter what type of business you have, every website benefits from good SEO. As you make any URL changes on your website always remember to implement URL redirects. This way you can keep up with your ranking and focus on other parts of your business!
Want to know more?
How & Why you Should Create a Custom "404 Page Not Found" Page in Squarespace
If you liked this post, Pin it to Pinterest! 👇🏻